GNU/Linux Toolbox
Command-line literacy in 7 steps
This manual is an attempt to discuss fundamental skills and programs, which enable seamless communication between the user and Linux operating system. My aim is to explain these concepts thoroughly and provide concise examples, which help to internalize covered material by demonstrating its practical application. My primary focus is to organize the content in coherent and understandable manner.
I assume that you know how to install Linux operating system and access terminal program running Bash shell. This manual focuses on CLI (Command-line interface) and TUI (Terminal user interface) programs exclusively. It is by no means complete. It serves as an introduction.
All commands included in the tutorial were tested on Ubuntu 22.04.3 LTS.
1.0 Working with text
Working with plain text, be it in the command-line prompt or files, is a valuable skill.
It pays off to form good habits early on.
In this chapter I'll focus on good practices that make life in the command-line environment easier.
In Linux there's a number of shells that one can use, but I'll focus on Bash (Bourne Again SHell), since it's the most popular one.
1.1 GNU Readline Library
The line of text after the prompt, which usually looks like this: username@hostname:~$, is stored in the buffer.
Content of the buffer gets sent to the OS when you press Enter.
You can confirm with Enter from anywhere in the buffer, i.e. the blinking block doesn't have to be at the end of the line for this to work.
There's a lot that you can do outside of just writing the text of a command with its options/flags and pressing Enter to confirm.
Here's the list of such additional functionalities and means of editing content of the buffer:
Navigation
← and →
// moving the cursor one character at the time
Ctrl + ← and Ctrl + →
// moving the cursor one word at the time
Alt + B and Alt + F
// moving the cursor one word at the time
Backspace
// deleting back one character at the time
Alt + Backspace
// deleting back one word at the time
Delete
// deleting forward one character at the time
Alt + D
// deleting forward one word at the time
Ctrl + Delete
// deleting forward one word at the time
Ctrl + U
// deleting all characters from the cursor position until the beginning of the line
Ctrl + K
// deleting all characters from the cursor position until the end of the line
Ctrl + Y
// to yank (paste) the deleted (cut) text
Ctrl + W
// delete (cut) one word at the time, backwards
Alt + D
// delete (cut) one word at the time, forward
Ctrl + A
// changes cursor position to the beginning of the buffer
Home
// changes cursor position to the beginning of the buffer
Ctrl + E
// changes cursor position to the end of the buffer
End
// changes cursor position to the end of the buffer
Alt + .
// add (paste) an argument of the previous command
History
↑ and ↓
// browsing issued commands history back and forward
Ctrl + P and Ctrl + N
// browsing issued commands history back (Previous) and forward (Next)
Ctrl + R
// reverse-i-search feature, searching for a specific issued command
Ctrl + G
// to exit reverse-i-search gracefully
Auto-completion
Tab
// shell auto-completion feature (when one match is found)
2x Tab
// shell auto-completion feature (when multiple matches are found)
Assorted
Ctrl + Alt + T
// open new shell session
Ctrl + D
// close the current shell session
Ctrl + L
// clear the screen
clear
// clear the screen
sudo !!
// forgotten sudo in front of the previous command
Alt + C
// capitalize word
Alt + L
// lowercase word
\ + Enter
// next line of input
The simplest way to copy and paste within terminal emulator program is to paste the selected text with middle-click.
If you you can't middle-click (in case you're using a trackball for instance) you can paste the contents of your clipboard with Ctrl+Shift+V.
To copy text within terminal emulator use Ctrl+Shift+C.
1.2 Here document
Here document is an easy way of generating multi-line output in the terminal or creating text documents without an editor, which is fast and useful for training purposes. By using it you'll also learn a bit about input/output redirection, which is an extremely important element of Bash shell landscape and one of its key functionalities.
Example 1: Print using cat
            $ cat << EOF

            > This is my example text.

            > It consists of:

            > - multiple characters

            > - multiple words

            > - multiple lines of text

            > EOF

            This is my example text.

            It consists of:

            - multiple characters

            - multiple words

            - multiple lines of text
Example 2: Redirect and save to a file
            $ cat << EOF > heredoc.txt

            > This is my new example.

            > This time these words will be sent/redirected to a file.

            > My file is called heredoc.txt and I'll be able to display its contents with cat command.

            > EOF

            $ cat heredoc.txt

            This is my new example.

            This time these words will be sent/redirected to a file.

            My file is called heredoc.txt and I'll be able to display its contents with cat command.
1.3 Nano - Nano's ANOther editor
Nano is a basic Linux text editor and its behavior is very similar to Windows Notepad and MacOS TextEdit.
It is installed by default on popular Linux distributions.
The key strokes covering most common operations are listed comfortably in the box at the bottom of the screen.
To learn more about it press Ctrl + G.
1.4 Survival-level VIM - Vi IMproved
Vim is very versatile and feature-rich.
It has a dozen editing modes, but I'll focus on two key ones: Insert mode (for editing text) and Normal mode (for editor commands).
Vim does seem scary at first glance, but the feeling will subside, if you choose to get to know it better and practice using it.
Learning the ins and outs of Vim can be a life-long adventure. Pursue of Vim excellence doesn't seem to end.
There's always more to discover, but we're here to cover the basics.
Basic operations
Insert mode
a // append text on the right to the current cursor position
A // append text at the end of the line
i // insert text on the left to the current cursor position
I // insert text at the beginning of the line
o // enter a new line below the current one
O // enter a new line above the current one
Normal mode
x // delete the highlighted character
dd // delete the current line and place it in the buffer
yy // copy (yank) the current to the buffer
p // paste content of the buffer (below)
P // paste content of the buffer (above)
/phrase
// look for the phrase in the document (forward, N for next occurrence)
?phrase
// look for the phrase in the document (backward, N for next occurrence)
:$/old/new/g
// replace old string with new one in the current line (no confirmation)
:$/old/new/cg
// replace old string with new one in the current line (with confirmation)
Saving and exiting
:w // save
:q // quit
:w! // force-save
:q! // force-quit
Navigation
h // move cursor left
j // move cursor down
k // move cursor up
l // move cursor right
w // move cursor to the beginning of the next word
b // move cursor to the beginning of the previous word
$ // move cursor to the end of the line
0 // move cursor to the beginning of the line
:$ // move cursor to the end of the file
:n // move cursor to the Nth line of the file
Ctrl + F // scroll one screenful down (forward)
Ctrl + B // scroll one screenful up (backward)
c // replace existing text
d // delete existing text
cw // replace existing text from the cursor postion until the end of word
dw // delete existing text from the cursor postion until the end of word
c$ // replace existing text from the cursor postion until the end of line
d$ // delete existing text from the cursor postion until the end of line
To practice your newly acquired Vim skills, go ahead and issue vimtutor command in your terminal.
2.0 Getting help
Internet search is the first thing that comes to mind when you need some kind of advice/soultion to your Linux-related problem.
StackExchange websites like Unix & Linux, supersuser, serverfault, or distribution-specific Ask Ubuntu come to mind and serve this purpose very well.
There are also countless forums, some of them not so friendly to newbies (Linux elitism is a real thing), where you can post your question and hope for a civil and helpful reply.
But there's no need to rely on that, when you can discover a solution to your problem without leaving your terminal window.
At this point in your journey, more often than not, it's all in the system documentation. Help commands are the tools to access this knowledge.
It's good to know how to use them.
2.1 man and help
man command displays system's manual of a specified program in the following format man program.
It is called the system's manual pager, and this is an apt description, becasue it behaves like a pager (less), which I'll discuss in section 3.5.
Thie most important sections of its output are DESCRIPTION, OVERVIEW, and OPTIONS, with an emphasis on the last one.
Usually you'll go there to learn about program's flags that enable certain features.
Flags alter its default behavior, for example with uname -a you get different result than with uname alone.
Since man behaves like a pager it is searchable. To trigger search function you use forward slash /phrase.
To scroll you can use scroll wheel (duh!). f/b or Page Up/Page Down or space allows to scroll one screenful at the time.
To quit you press Q.
help is somewhat similar to man. It serves the same purpose.
However it works only for shell built-in commands, like true, false, for, or if.
Perhaps the first thing that you'll notice is its brevity. Also, most of the time it doesn't have sections like man.
To list all shell built-ins just type help alone.
man man and help help were helpful in putting together the explanation above.
3.0 Interaction with the file system
Time for some real action! In this section I'll show you how to perform basic operations in the file system using Linux commands.
As you'll discover with those you can be far more specific and efficient.
Rather than clicking around in Windows File Exoplorer (yuck!) or MacOS Finder (less yuck, since MacOS is UNIX-like) you can be very precise and get exactly what you need within seconds.
All of this, and more, within one terminal window.
3.1 Your identity
3.1.1 whoami and hostname
ACCORDION TEXT
3.1.2 su and sudo
ACCORDION TEXT
3.2 Navigate, browse, and search
3.2.1 pwd and cd
ACCORDION TEXT
3.2.2 ls and tree
ACCORDION TEXT
3.2.3 Wildcards and Tab autocompletion
ACCORDION TEXT
3.2.4 find, xargs, and locate
ACCORDION TEXT
3.3 Your history
3.3.1 Reverse-i-search and history
ACCORDION TEXT
3.3.2 fc and hash
ACCORDION TEXT
3.4 File operations
3.4.1 touch and rm
ACCORDION TEXT
3.4.2 mkdir, rmdir and rm -r
ACCORDION TEXT
3.4.3 Bash brace expansion
ACCORDION TEXT
3.4.4 mv and rename
ACCORDION TEXT
3.4.5 cp, ln and ln -s
ACCORDION TEXT
3.4.6 basename, dirname, realpath, and readlink
ACCORDION TEXT
3.5 Display, page and limit text output
3.5.1 echo and printf
ACCORDION TEXT
3.5.2 cat, tac, and rev
ACCORDION TEXT
3.5.3 nl, fold, and paste
ACCORDION TEXT
3.5.4 wc, uniq and sort
ACCORDION TEXT
3.5.5 less and most
ACCORDION TEXT
3.5.6 head and tail
ACCORDION TEXT
3.6 Compare and transform text
3.6.1 diff, comm, and cmp
ACCORDION TEXT
3.6.2 tr, grep, sed, and awk
ACCORDION TEXT
3.6.2 Introduction to regular expressions (regex)
ACCORDION TEXT
3.7 Archiving/compression tools
3.7.1 tar
ACCORDION TEXT
3.7.2 gzip and gunzip
ACCORDION TEXT
3.7.3 bzip2 and bunzip2
ACCORDION TEXT
3.7.4 xz and unxz
ACCORDION TEXT
3.7.5 zip and unzip
ACCORDION TEXT
3.7.6 rar and unrar
ACCORDION TEXT
3.7.7 unar (The Unarchiver) + lsar
ACCORDION TEXT
3.8 Task control and scheduling
3.8.1 jobs, fg, and bg
ACCORDION TEXT
3.8.2 sleep and watch
ACCORDION TEXT
3.8.3 at, cron, and anacron
ACCORDION TEXT
3.9 Package management tools
3.9.1 dpkg and apt
ACCORDION TEXT
3.9.2 rpm and dnf
ACCORDION TEXT
4.0 User and group management
I'm sure that you're not alone in /etc/passwd file, but if you don't feel like playing with these guys you can always spawn a new imaginary friend with adduser.
Linux administators manage accounts of actual, real humans. It's part of their job. You can still practice those skills in a single-user Linux enthusiast scenario.
There are no limits to a number of users and groups you can create. Let's do that with the cast of The Office.
Hopefully this popular culture reference twist will make it even more exciting.
4.1 adduser, addgroup, usermod, and gpasswd
Let's populate our system with characters from The Office series.
We'll use adduser command, which is an interactive version of useradd.
It doesn't require any flags to create a complete, fully-usable account.
The actions below require superuser privileges, so my commands are prefixed with sudo.
For account creation I use sudo adduser username and for adding my newly created user to sudoers, those allowed to act as a superuser, sudo usermod -aG sudo username.
I can then check if my user was successfully assigned to this group with groups username (doesn't require sudo).

After adding missing personnel and departments (with sudo addgroup groupname) this is what it looks like.

Now it's time to assign people to their respective roles. It can be done in bulk with a for loop (for i in user1 user2 user3; do usermod -aG groupname $i; done).
For loops are outside the scope of this tutorial, but as you can see this use-case is rather self-explanatory.
It's better to become root for this one (with sudo -i).
We can see our recent changes with another simple loop (for i in mscott dschru jhalpe pbeesl ehanno rhowar amarti kmalon omarti; do groups $i; done).
To get back to your user account just type exit.

Remember how Pam was transferred from Reception to Sales? We can do the same thing in the terminal with gpasswd and usermod.
To make it more realistic we'll use Michael's account to perform the change.
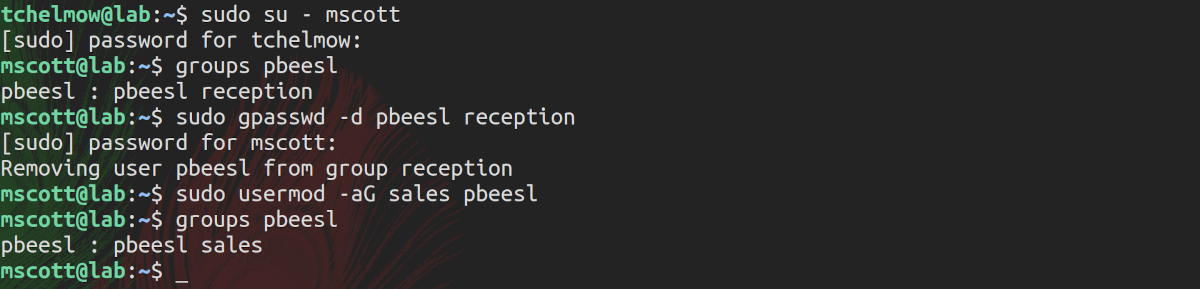
Notice that sudo gpasswd -d user group has different order of arguments comparing to the usermod one.
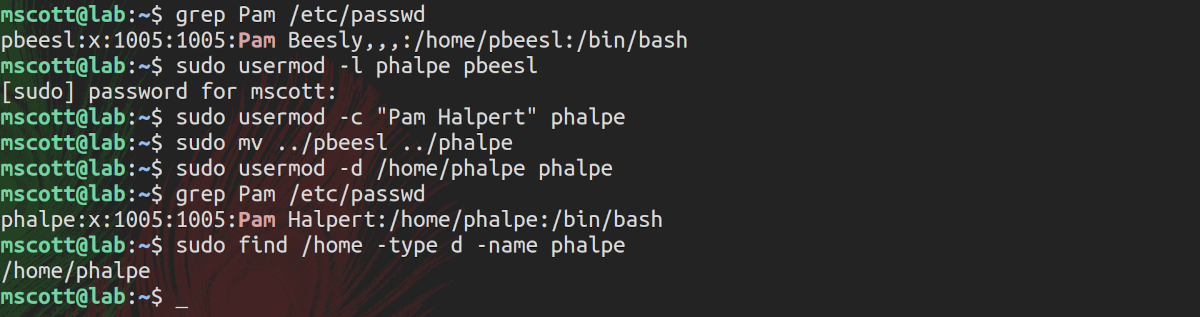
Since Pam is married to Jim her status in our system has to reflect that. We can apply such change with usermod.
Overwriting her username and Full Name can be achieved with sudo usermod -l new_user old_user and sudo usermod -c "New Name" new_user.
When changing the username and Full Name, you also need to change user's home directory.
This can be done with mv ../old_user ../new_user (to rename their directory in /home) and usermod -d /home/new_user new_user to apply the change to /etc/passwd.
Now that we're done we can check if all went well with grep and find.
As you might have noticed I didn't change my user from Michael. For the sake of our scenario let's say that Michael became a chaplain and officiated their wedding.
If one of our employees is misbehaving we can suspend them by locking their account. Ryan, I'm really sorry.
In passwd's command output "L" is for locked and "P" stands for unlocked.

4.2 passwd, groupmod, deluser, and delgroup
passwd is commonly used to change your own or somebody else's password (with sudo).
Practice it with passwd and sudo passwd user.
It has more features, like deleting a password, forcing its expiration, locking/unlocking (as we've seen in section 4.1), or defining the time of its validity.
groupmod allows to change group's name.
We're gonna illustrate it with the first thing that comes to mind after watching 93rd episode, Two Weeks.

deluser is self-explanatory. We use it to get rid of an account.
Since Ryan was promoted to VP of Northeastern Sales and left the Scranton branch his account has to go.

If you don't have perl installed deluser will greet you with /usr/sbin/deluser: In order to use the --remove-home, --remove-all-files, and --backup features, you need to install the `perl' package. To accomplish that, run apt-get install perl.
Then you simply do as instructed, sudo apt update and sudo apt install perl -y.
delgroup does exactly what its name suggests. Ryan is no longer in Scranton, so our temp group can be deleted.

This concludes User and group management tutorial with The Office US. I hope you've enjoyed it.
5.0 File permissions
With those you define who has access to what, and specify what they're allowed to do with it.
That's the basic explanation, but as you'll see there's much more to it.
In Linux you have very granular control over what's going on access-wise.
ACL (Access Control List) for instance, serves as an extra layer on top of regular rwx/ugo criteria.
Curious what the cryptic bit is all about? Read on.
5.1 chmod, chown, chgrp, and umask
5.2 Set UID, Set GUID, and Sticky bit
5.3 getfacl and setfacl
5.4 lsattr and chattr
6.0 System monitoring and maintenance
For a seasoned mechanic quick look under the hood is enough to tell what is wrong with your car.
Hopefully he knows how to fix it, too. Garage is full of all kinds of wrenches and spare parts and whatever mechanics store there.
I really don't know. I can't drive, let alone own a car.
Wondering where am I going with this? Linux administrator does the car mechanic thing, but with different tools.
Troubleshooting a malfunctioning system or misbehaving service without these would be impossible.
By putting together information obtained from diagnostic tools you can pinpoint the cause of your software problem.
Fixing things on your own is very rewarding.
6.1 User information
6.1.1 users, who, w, and last
ACCORDION TEXT
6.1.2 id and finger
ACCORDION TEXT
6.2 Command and file information
6.2.1 type and whatis
ACCORDION TEXT
6.2.2 which and whereis
ACCORDION TEXT
6.2.3 file and stat
ACCORDION TEXT
6.3 Disk space and partition information
6.3.1 df, du, and ncdu
ACCORDION TEXT
6.3.2 fdisk -l and mount
ACCORDION TEXT
6.4 Process and resource usage information
6.4.1 uptime, ps and top
ACCORDION TEXT
6.4.2 kill, killall, nice, and renice
ACCORDION TEXT
6.4.3 pgrep, pkill, and ps --pid
ACCORDION TEXT
6.4.4 htop and glances
ACCORDION TEXT
6.4.5 lscpu, free, and lshw
ACCORDION TEXT
7.0 Linux boot process
Let's shed some light on how the stage is set for all the terminal goodness.
What exactly grants us access to those cool amenities, which we have at our disposal during each session?
What is PID 1? Why is it important? What is the meaning of MBR, GRUB, Runlevel and how is all of this intertwined to conjure our beloved Linux magic?
Let me explain.
7.1 Boot sequence
The startup sequence consists of 5 high-level stages: UEFI/BIOS, MBR, GRUB 2, Kernel, and SystemD.
UEFI (Unified Extensible Firmware Interface) or BIOS (Basic Input/Output System) performs system's hardware check, POST (Power On Self Test).
Its task is to ensure that your hardware works correctly. If it succeeds our next stop is MBR (Master Boot Record).
MBR is a place where information about GRUB 2 (GRand Unified Bootloader) is stored.
It's located in the first sector of the bootable disk.
GRUB 2 tells the computer where to find system's kernel and loads it into memory.
As a side note: It does that after its splash screen, which awaits user's action for a few seconds.
It defaults to the kernel image specified in GRUB's configuration file.
Kernel is often called the core of an operating system.
It basically controls everything that it does.
Its task in boot process is to first extract itself (it is in compressed format to save space) and load sytemd.
SystemD initializes the user space and manages system services during the boot sequence.
It's able to start multiple processes in parallel, which improves boot time.
It mounts the filesystems defined in /etc/fstab file.
In its configuration file there's an information on which target should be used for your session.
For a desktop system it's target 5 by default. You can check it with runlevel or who -r command.
SystemD provides service manager that runs as PID 1 and starts the rest of the system.
You can check your PID 1 process with htop --sort-key PID command.
More information on htop can be found in section 6.4.
Appendix: Wildcards, RegEx, and POSIX character categories
Wildcards (globbing patterns)
? (question mark)
represents any single character
* (asterisk)
represents zero or more characters
[ ] (square brackets)
specifies a range
{ } (curly brackets)
terms are separated by commas and each term must be the name of something or a wildcard. Example: cp {*.doc,*.pdf} ~
[!] and [^]
similar to the [ ] construct, except rather than matching any characters inside the brackets, it'll match any character, as long as it is not listed between the [ and ]; logical NOT
\ (backslash)
"escape" character, protects subsequent special character
RegEx (regular expressions)
. (dot)
matches any single character, equivalent to ? wildcard
\ (backslash)
"escape" character, protects subsequent special character
.* (dot and asterisk)
matches any string, equivalent to * wildcard
* (asterisk)
the proceeding item is to be matched zero or more times
^ (caret)
means "the beginning of the line"
$ (dollar sign)
means "the end of the line"
[ ] (square brackets)
specifies a range
|
logical OR relationship between wildcards
[^]
equivalent of [!] wildcard; logical NOT
POSIX character categories
[:upper:] uppercase letters
[:lower:] lowercase letters
[:alpha:] alphabetic (letters); [:upper] and [:lower:]
[:digit:] numbers in decimal (0 to 9)
[:alnum:] alphanumeric; [:alpha:] and [:digit:]
[:space:] whitespace (spaces, tabs, newlines and similar)
[:graph:] graphically printable characters excluding space
[:print:] printable characters including space
[:punct:] punctuation characters; [:graph:] minus [:alpha:] and [:digit:]
[:cntrl:] control characters; non-printable characters
[:xdigit:] characters that are hexadecimal digits
Author
Tomasz Chelmowski Autodidact interested in technology and foreign languages. Always on a lookout for a new skill or hobby to pick up.
10+ years of experience in IT. Since mid-2016 Linux enthusiast and practitioner.
Professionally, Application Support Engineer.
I'm located in Wroclaw, Poland.